Orchard Notes: August 2021
Pre-Harvest & Harvest Prune Orchard Considerations, 2021
Franz Niederholzer, UCCE Farm Advisor, Colusa, and Sutter/Yuba Counties
Luke Milliron, UCCE Farm Advisor, Butte, Glenn, and Tehama Counties
Becky Wheeler-Dykes, Tree Crop Researcher, CSU Chico
August
- Watch pests and tree water status. Monitor blocks for spider mites, rust, and water status approaching harvest. If spider mite pressure is building right before harvest, consider a potassium nitrate spray to “top off” the potassium levels in the trees and suppress adult spider mites for 2-3 weeks. Leaf loss from mites, rust, and/or water stress slows harvest as blowers work to keep extra leaves out of the bins and also exposes scaffold branches to sunburn in the postharvest heat of August and early September.
- Time your irrigation cut-off to improve dry-away ratios, reduce premature fruit drop and decrease shaker bark damage at harvest. In a drought year like this, trees may be more water-stressed than in wetter years as harvest approaches, so irrigation cut-off might be closer to shake time than in previous years. The pressure chamber is a great irrigation management tool for monitoring tree water stress. In July and August, prior to harvest, stress should be mild to moderate (-12 to -16 bars). Moderate to high tree stress (-16 to -20 bars) may be tolerated a week or two before harvest.
-
- Growers with orchards (or replants) on the new Krymsk 86 (K86) rootstock should take special care to make sure trees are sufficiently dried down before shaking to avoid bark damage. Don’t expect K86 rooted trees to dry down as quickly as those on plum rootstocks (M29C, M40, and/or M2624). See the article in this newsletter about pre- and post-harvest irrigation for more information.
-
- Monitor fruit maturity development. Fruit is mature when internal pressures are 3-4 lbs. Fruit pressure, not sugars, determines fruit maturity. Fruit over 4 lbs. internal pressure has not finished accumulating sugars (dry weight) and will be worth more to a grower if harvested when the internal pressure drops below 4 lbs. See the article in this newsletter on harvest timing and field sizing for sampling details.
- Field sizing decisions. In the past, many growers ran a 15/16” sizer (AKA sizing chain) to remove garbage and undersized fruit. In recent years, with small and medium fruit holding much less value than large fruit, some growers have gone to using larger sizers to eliminate smaller fruit. Double-check with your packer about dried fruit value by screen size to help decide if a large sizer (1” or larger) would be a good idea. If you run a sizing chain, regardless of the size, run the receiver belts slowly enough to allow all the fruit to be run directly over the chain and properly sized. See the article in this newsletter on harvest timing and field sizing.
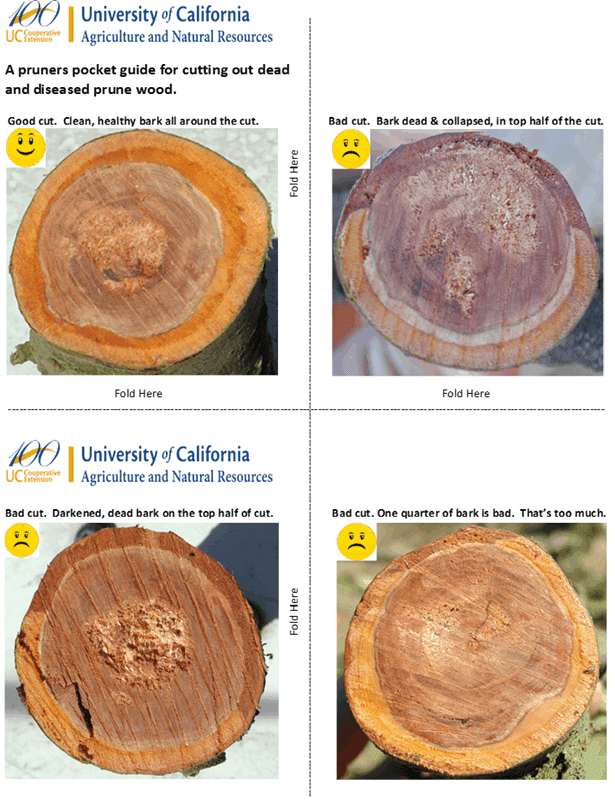
- Clean up the orchard before harvest. Remove dead and dying limbs along with significant (woody) suckers. This will help minimize tree (and shaker) damage during shaking and make for a more efficient (faster) harvest. When cutting out diseased wood, it’s essential to prune past the diseased wood and into healthy wood, find a pruner’s pocket guide in this newsletter.
- Examine fruit pre-harvest to evaluate the damage. Two to four weeks before harvest, evaluate 40 fruit per tree from 25 trees throughout the orchard for worm, scale, and brown rot damage. Fruit can be picked or evaluated on the tree. If you just take samples at harvest, you may miss damaged fruit that dropped early. This may indicate room for improvement in your IPM program.
Post-Harvest
- Manage post-harvest irrigation to minimize water stress. This is very important for orchard health going into winter. Cytospora canker grows faster in orchards under water stress. Your orchard could show it next year if you ignore or partially ignore your orchard irrigation this fall. Following harvest, water stress measured as stem water potential using a pressure chamber should be mild to moderate (-12 to -16 bars).
- Fall nutrition program. When making fall nutrient management decisions consider your July leaf sample results and crop load. If nitrogen levels in your July leaf sample were below the critical value, consider a fall foliar nitrogen spray, especially in young orchards where low nitrogen can predispose the trees to bacterial canker infection over a cold/wet winter. Soil applied nitrogen, especially after September, is vulnerable to leaching because of limited root activity. Soil applied potassium (K) should be banded in the fall. This practice is an inexpensive method of delivering needed potassium to the orchard for the following crop year. Alternative programs focus on applying potassium during the next growing season and may include fertigating more expensive liquid materials (KTS, liquid MOP, potassium carbonate, etc.), foliar applications of potassium nitrate, or some combination of fertigation and foliar application.
- Orchard clean up and pruning. Plan for pruning to remove Cytospora cankers, cut out branches damaged during harvest, tame tree size and manage next year’s crop load. Again, to ensure all infected wood is cut from the tree, see photos of a “clean” pruning cut in the pruner’s pocket guide in this newsletter. Avoid pruning two weeks prior to a rain event. We strongly recommend protecting pruning wounds with a fungicide spray (e.g., Topsin-M® or Topsin-M + Rally®), especially if rain is in the forecast.
- Fall/winter aphid control. Fall and winter preventative management for aphids can be an effective and ideal time to treat orchards with a history of problems, particularly if no dormant sprays will be applied for scale or peach twig borer. Fall aphid sprays are not effective for scale and don’t provide the same level of control as dormant timings for peach twig borer During the dormant period, a moderate rate of pyrethroid is effective on aphids and peach twig borer but keep water quality risks in mind when timing dormant pyrethroid applications. Adding oil to a dormant pyrethroid treatment can provide additional efficacy against scale populations. Oil, alone, will control small to moderate scale populations. (To avoid oil burn, don’t spray dry dormant trees with oil.) For additional detail, click HERE to see articles on prune aphid management.
- San Jose Scale. Once leaf fall begins, dormant spur samples can be used to scout for San Jose scale and European fruit lecanium, evidence of parasitism in both species, as well as aphid eggs and European red miteThis information will help determine if a dormant spray program is needed and, if so, what’s in the spray tank.
- Weed Management. Conduct a post-harvest weed survey to evaluate your 2020 weed control program. Pre-emergent herbicide should be applied shortly before a moderate rain event (0.25”) to move material into the soil. Avoid application prior to a large rain event (> 1”), which can move the product too deep into the soil for good weed control.
- Late fall to early winter is prime gopher control timing because populations are generally lowest at this time of year.
Getting the Best Grower Returns at Harvest
Franz Niederholzer, UCCE Farm Advisor, Colusa and Sutter/Yuba Counties
Luke Milliron, UCCE Farm Advisor, Butte, Glenn, and Tehama Counties
Richard Buchner, UCCE Farm Advisor Emeritus Tehama, and Glenn Counties
Harvest timing and field sizing are the management details to focus on to maximize grower income. The keys to timely harvest are 1) getting the largest, high-quality fruit to the dryer and 2) field sorting to keep as much small, low-value fruit out of the bins as possible.
Harvest timing: Properly timed harvest delivers the best grower returns and quality fruit to market. Fruit in an orchard is mature and ready to harvest once average internal pressure drops below 4 lbs. Early harvest: shaking when pressure fruit is more than 4 pounds “leaves money on the table”; the fruit isn’t finished putting on dry weight. Shaking late, when the fruit is very soft, risks crop loss if winds pick up and ripe fruit drops to the orchard floor (early drop). The target start time is 3 to 4 lbs. internal pressure. Each week, fruit pressure generally drops 1.5 pounds pressure (faster rate in cool weather, slower rate in hot weather) and sugars increase around 2%. Sugar increase occurs by fruit dehydration (concentration) once the fruit is mature (internal pressure is in the 3-4 lb. range).
The following are UC recommended steps to measure prune fruit maturity:
- Sample 25 fruit from the block, sampling five fruit from five trees. Take fruit from the inside and outside of the canopy. Flag the trees so that the same trees will be used from week to week.
- Slice the skin off the fruit “cheeks” on both sides of each fruit. Just remove the skin, take as little flesh off as possible. *Save the fruit for sugar testing after pressure testing.
- Measure fruit firmness on each cheek using a “fruit pressure tester” with a 5.16” tip. Fruit pressure testers cost around $300/each.
- Calculate the average pressures per fruit and record that number. Then, calculate the average fruit pressure for the block. Use the average fruit pressure to determine harvest timing but watch for very low pressures that might indicate early drop of some fruit.
- Track fruit pressure each week to determine harvest timing.
- PRUNES ARE MATURE BETWEEN 3-4 POUNDS INTERNAL PRESSURE. When timing the harvest’s start, growers must consider the number of acres to shake, available dryer space, tree age/crop load, and fruit pressures in each block. For example, it may be better to start early in the youngest orchard with a light crop and high sugars and then move to older, heavier cropping orchard with lower sugars afterward. This gives the older block a few more days to improve sugar levels.
*After pressure testing, determine sugar levels in the orchard (% soluble solids; % SS). Cut all 25 fruit in half from the stem to the blossom end, slicing along a flat side of the pit. Put all 25 fruit halves (the side without the pit) in a blender and puree the fruit. Squeeze fruit juice from the puree through a cheesecloth or paper towel onto a refractometer and determine percent soluble solids (sugars). There is usually less sugar in the fruit flesh closer to the pit, so this method usually delivers a lower % SS value than if flesh from just under the skin is used.
Field sizing: Small fruit (C screen or smaller) are worth less than A and B screen fruit, but maximizing large fruit production (and net grower returns) means growing some small fruit. We recommend growers take time and estimate dry fruit size ahead of harvest to help with field sizing decisions. Each grower must make their own decisions based on the crop in their orchard and pricing information from their packer.
Before we get into sampling details in a particular orchard, here is a critical point. Field sizing is worth doing, but impossible to do perfectly. Why is perfect field sizing such a challenge? Fresh fruit size and fruit sugar concentration (% soluble solids) determine dry fruit size (see “Claypool Table,” Table 1). Field sizers, working properly with careful fruit flow on the receiver, drop fresh fruit of a certain diameter (assuming all the fruit has the same pressure). But, sizers can’t tell individual fruit sugar levels. Fruit of the same fresh size but different sugar content will have different dry fruit sizes. That difference in fresh fruit sugar level can be the difference between a B or C screen dry fruit. For example, a medium (27 fresh fruit/lb.) sized fresh fruit should make a dry fruit in the range of 71 to 81 ct./lb. size (based on the Claypool Table) if the fruit had 26% SS or 20% SS, respectively. So, for that same sized piece of fresh fruit, differences in sugar level will either deliver good value or poor value to the grower. But, it’s impossible to tell by fresh fruit size, alone, which will be which. Growers must decide how aggressive they want to be with field sizing to separate medium-sized fruit from large fruit. Predicting, from field measurements, the fruit size in the orchard heading into harvest will be helpful in determining how aggressively to field size.
Field sizing is a lot like fruit thinning, there is a lot of art and experience mixed in with the science. Here are some factors to consider when planning 1) should you field sort, and 2) how big of a sizer chain to use. First, know what the crop looks like in your orchard. Use the Claypool Table (Table 1) to estimate the average dry fruit size in your orchard. This table is not perfect and tends to be generous, predicting larger average dry fruit size for certain sugar values than actually were delivered. However, it is a place to start.
The following is a sampling program to estimate average dry fruit size in an orchard suggested by Bill Olson (UCCE Farm Advisor, Butte Co, retired) in a 1999 newsletter.
- At the beginning of harvest, take several 100 fruit samples from each orchard. Each sample = 100 fruit (20 fruit from each of 5 trees, be sure to sample both fruit clusters inside and outside of the tree at eye level).
- Weigh each fresh sample (100 fruit per sample) separately.
- Divide the number of fruit in each sample (100) by the weight of the sample (in lbs.) to determine the number of fresh fruit per pound.
- Determine percent soluble solids (method above).
- Average the fresh count and soluble solids values for all samples to determine the orchard average. Different areas in the orchard could be treated separately if differences in crop exist that may require different harvest strategies.
- Use the Claypool Table (Table 1, below) to predict your dry count/lb. based on your average fresh count/lb. and soluble solids for the orchard. Compare that average with the previous year’s average fruit number and P1 values for different screen sizes to get a sense of the percentage of C screen and smaller fruit in the current crop. That will help you decide how big a sizer to run.
It will be important to check the results of field sizing before and during harvest. Set a chain size, and collect the fruit dropped through that chain size by placing a tarp on the ground under the sizer. Run a fresh fruit count and sugar check to compare with the Claypool Table to see, in general, what size fruit is being dropped. Adjust chain size up or down as needed in that orchard. Once harvest has started, check the size and sugar of fruit dropped through the chain several times during the season. This is especially important later in the season, as the fruit softens and sugars increase, so valuable fruit isn’t lost.
Growers who thinned in the spring should have less small fruit on the trees at harvest than if they hadn’t thinned. However, even if the expected average dry fruit count in an orchard is in the 50’s, there could still be a significant amount of medium and smaller sizes in the delivered crop. For example, a thinned block in the Yuba City area several years ago had an average dry ct./lb. of 57 for a 2.6 dry ton/acre crop, with 15% of that crop, by weight, at 72 count or smaller. There was 6% C screen, 5% D screen, and 5% undersized in that thinned orchard.
Finally, during harvest, make sure the belts feeding the sizing chain are run slowly enough that all the fruit is run across the sizer in a single layer — so it can be sized. If the sizing chain has too much fruit on it, all fruit will not be sized and some smaller fruit that should have dropped out will be delivered to the dryer.
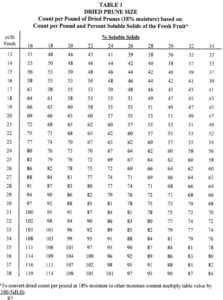 Table 1. The “Claypool Table” was developed by Dr. L.L. Claypool, UC Davis in the 1950’s. Recent research shows that this table can overestimate dry fruit size by an average of 10% and so should be considered only a guideline in estimating average dry fruit count/lb. before harvest.
New Staff Research Associate Introduction
Clarissa Reyes (she/her), UCCE Staff Research Associate
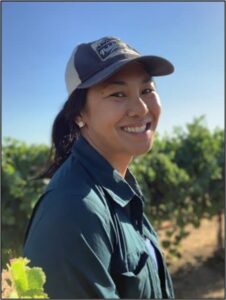 I am pleased to join Luke Milliron, Dr. Franz Niederholzer, and Dr. Rich Rosecrance to work with orchard crops in the Sacramento Valley. I grew up in Sacramento, CA, then attended UC San Diego, where I earned a BS in General Biology. After graduating, I worked in the biotech industry in San Diego, developing bio-derived products as renewable resources for commercial use. As my sense of environmental stewardship evolved, I returned to Sacramento to pursue an interest in sustainable agriculture at UC Davis. There I worked in the McElrone Lab, first as a lab technician and then as a master’s student in the Horticulture and Agronomy program. My research focused on applied water- and drought-related physiology in grapevine and woody species, with an emphasis on drought response in grapevine root systems. I recently moved to Chico for this position and am looking forward to exploring the surrounding areas for new places to hang out at the river, cycle, and camp. I am grateful to the Almond Board of California, California Walnut Board, California Pistachio Research Board, and the California Prune Board for funding my position with UC Cooperative Extension.
New Chico State Orchard Researcher Introduction
Becky Wheeler-Dykes, Chico State Orchard Researcher
 I am so excited to start my position as Orchard Researcher at Chico State with Dr. Rich Rosecrance, Dr. Franz Niederholzer, and Luke Milliron. I grew up on a prune and walnut farm in Gridley and am looking forward to getting back to my roots working in orchard research. I received my bachelor’s degree in Crop Science and Business Management from UC Davis. I continued at Davis for my master’s degree in Entomology, where I focused on pest management in almonds. Since completing my degrees in 2012, I have worked with soy, corn, grapes, and tree crops in agricultural research for both public and private entities. In my spare time, I enjoy chasing my three kids, working in the garden, and trying new recipes. I am grateful to the Agricultural Research Institute and the California Prune Board for funding my position with Chico State Enterprises.
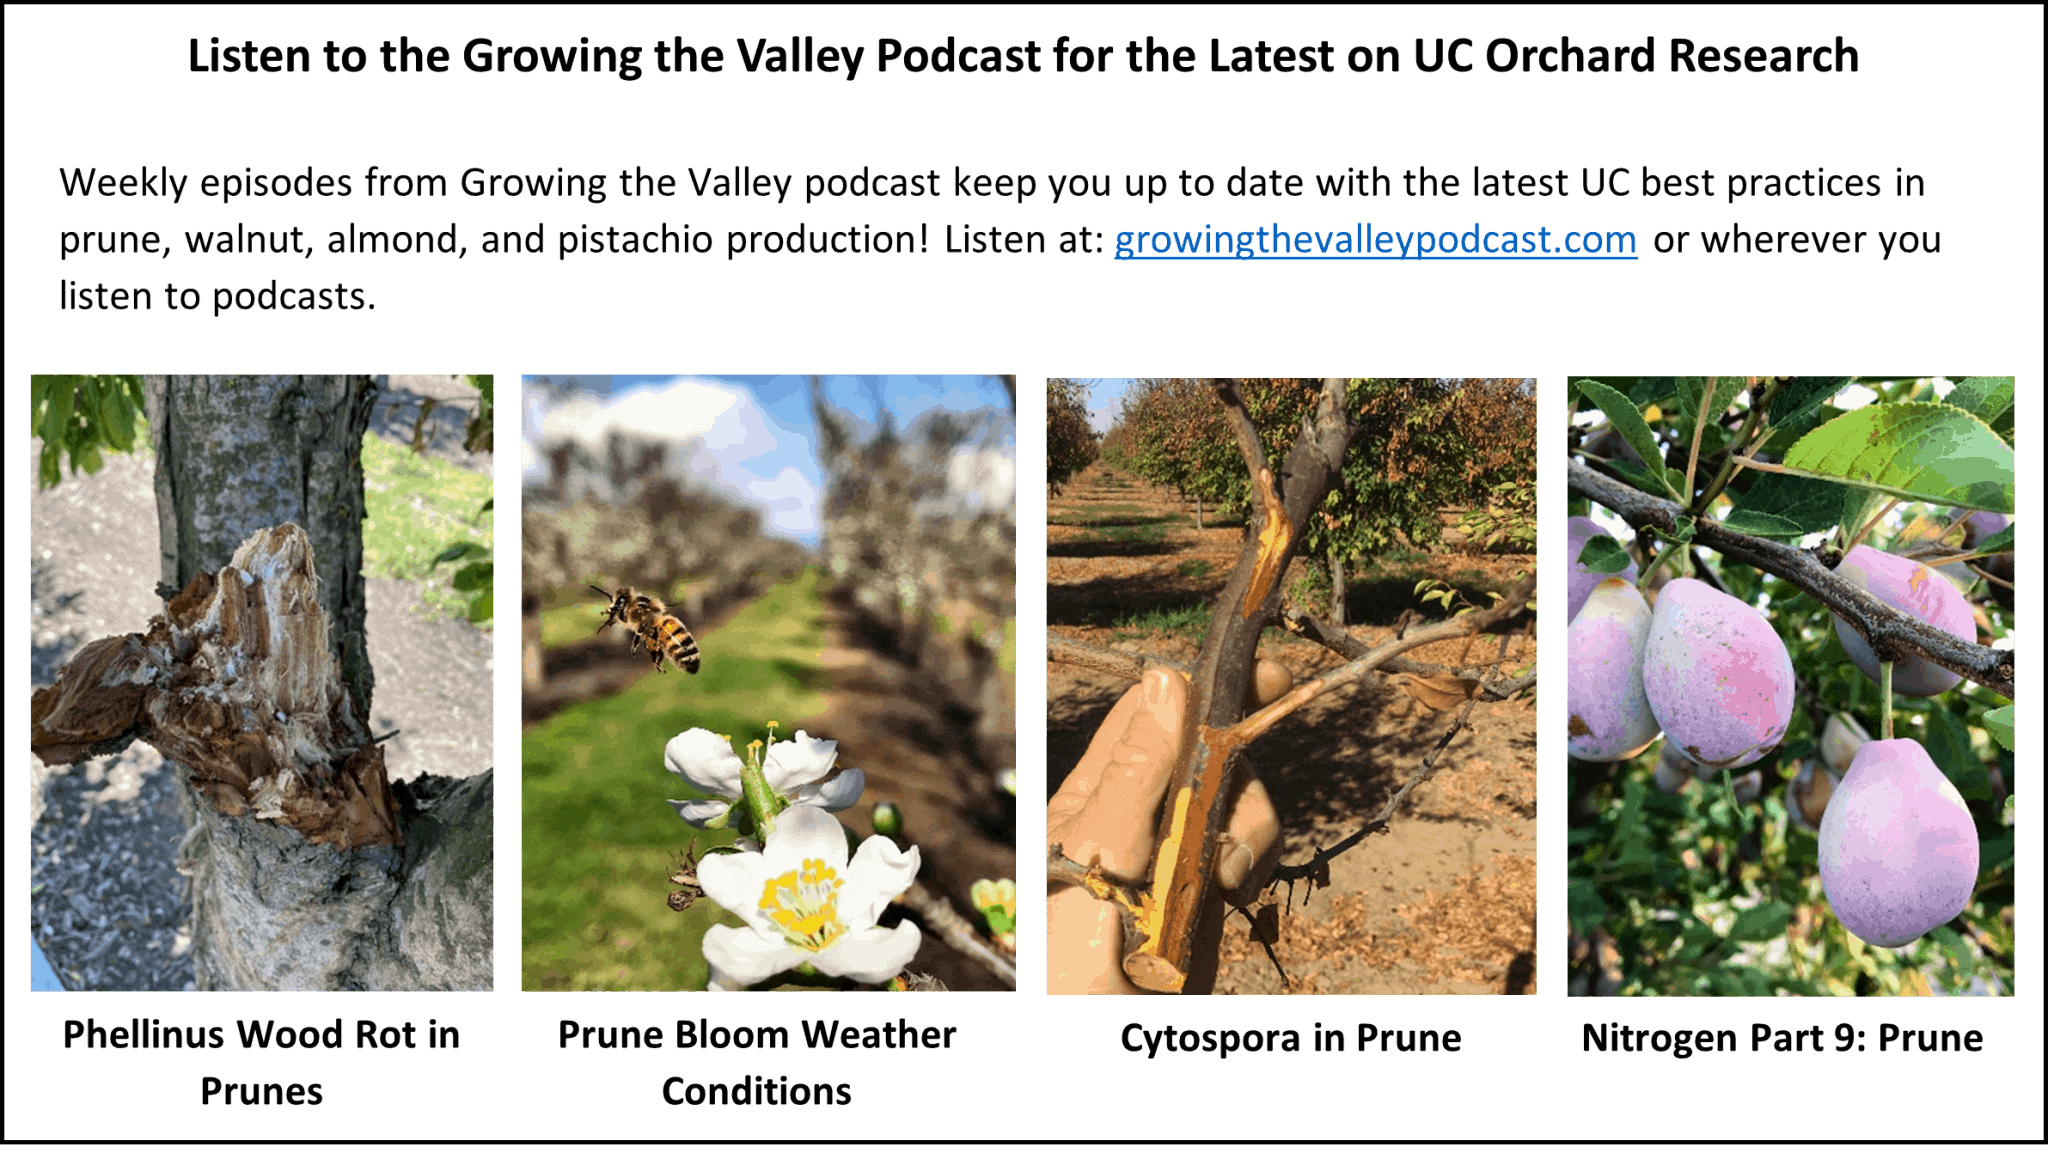
Fruit set, 2021. What happened?
Franz Niederholzer, UCCE Farm Advisor, Colusa and Sutter/Yuba Counties.
Hot weather (82-85ºF, maximum average hourly temperature) around full bloom coincided with local or statewide prune crop failures in 2004, 2005, 2007, 2013, and 2020. Orchards in the Sutter/Yuba area were hard hit in four of those five years.
For the last fifteen years UC research, supported by the CA Prune Board funds and Sunsweet Growers, Inc. staff, has focused on 1) determining what bloom weather conditions produce crop failure, and 2) how to save a crop when those conditions appear. So far, we have learned a lot about the weather causing crop failure, but no consistent, effective “fix” has been identified.
Researchers at UC Davis (2006-2008) showed that when air temperatures were artificially elevated from pre-bloom through full bloom with maximum temperatures in the 85ºF range, pollen tubes died before reaching the ovule. They concluded that this effect on pollen tube growth could stop flower fertilization and fruit set. Note: In this research, it took 4 – 6 days for pollen tubes to reach the ovule after pollination, with cooler temperatures slowing the growth of pollen tubes to the base of the flower.
So, sustained high temperatures (around 85ºF) can reduce prune fruit set. However, sustained heat is rare in the Sacramento Valley in March and daily maximum temperatures can vary by 15ºF through the 5-10 day period when flowers are opening. This raises the question; does the timing of extreme heat during bloom make a difference in crop set? To better understand crop risk under natural temperature patterns in prune orchards, UC Farm Advisors, staff, and Sunsweet Growers, Inc. employees tracked flower stage and temperature through bloom, annually since 2009, on a number of prune branches in multiple orchards from around the state. Fruit set on those branches was determined in late spring and then the percent fruit set on those branches was determined.
The conditions that lead to crop failure in prunes included the following:
- Warm February temperatures (max temps = 65-80ºF) leading to…
- Full bloom in the first two weeks of March
- Short bloom period (averaging 5 days between first flower and full bloom)
4a. High temperatures (82ºF or more) for 1-2 days within 2 days of full bloom
OR
4b. Low temperatures averaging around 55ºF for 4-5 days after full bloom.
The data indicate that prune flowers are most vulnerable to high temperatures when the bloom is early, it progresses rapidly (5 days or so) and full bloom (roughly 80% open flowers) is followed by as little as a day or two of extremely warm temperatures (82ºF or more). Interestingly, high temperatures prior to full bloom, followed by cooler temperatures around full bloom, have not impacted crop set since the project started (2009).
What can growers do to improve the set when hot weather is forecast at bloom? The only proven practice is running micro-sprinklers when temperatures are above 75ºF to provide some orchard cooling — usually, 1-2 degree temperature drop. That degree of cooling could be the difference between a decent crop set and crop failure.
Dormant season oil application (3-4% 440 hort oil applied in late December through mid-January) may move bloom ahead of the heat. In the Yuba City area, the application of heavy rates of horticultural oil (for example, 3-4 gallons of 440 oil/acre) as part of a scale control program advances bloom time by a few days. In years where extreme heat passed quickly (2005, 2020), dormant oil moved bloom ahead of the heat spike and so helped improve the set. Growers harvested a good crop. In years with extended heat (2004, 2007) or cool weather (2016), oil didn’t move bloom out of the bad weather and the set was not improved.
Post-harvest Orchard Clean Up and Pruning – A Pruner’s Pocket Guide
Plan for pruning to remove Cytospora cankers, cut out branches damaged during harvest, tame tree size and manage next year’s crop load. Again, to ensure all infected wood is cut from the tree, see photos of a “clean” pruning cut (below). Avoid pruning two weeks prior to a rain event. We strongly recommend protecting pruning wounds with a fungicide spray (e.g., Topsin-M® or Topsin-M + Rally®), especially if rain is in the forecast.
For a Healthy Orchard Next Spring, Follow Through on Late Season Irrigation in Your Prune Orchard
Luke Milliron, UCCE Orchards Advisor, Butte, Glenn, and Tehama Counties
Franz Niederholzer, UCCE Farm Advisor; Colusa and Sutter/Yuba Counties
Allan Fulton, UCCE Irrigation and Water Resources Farm Advisor Emeritus
Richard Buchner, UCCE Farm Advisor Emeritus
Summary: For the best returns and orchard health, ease up on irrigation before harvest, and after harvest keep up with irrigation until leaf drop.
Pre-Harvest Irrigation – The “Why” and the “How”:
Why does it matter how water-stressed trees are during summer and just before harvest? Keeping prune tree water stress mild to moderate from late June through to early August has a couple of key benefits. Mild to moderate water stress slows shoot growth, saving pruning expenses without affecting fruit sizing (fresh and dry weights). In addition, sustaining this mild to moderate stress helps manage energy and irrigation costs.
Irrigation cut-off one to two weeks ahead of harvest in late August also delivers benefits. The moderate to high levels of crop stress experienced by the trees with this irrigation cut-off may increase sugar content in fruit and reduce moisture content or “dry-away” (fruit drying costs). The cut-off also reduces the risk of bark damage at harvest.
How do we achieve mild to moderate water stress during summer and moderate to high levels of stress just before harvest? It may be unwise to rely on previous experience alone this year to achieve these different levels of water stress since low rainfall likely led to less soil water content all season long. In addition to experience, other approaches include ET calculations and soil moisture monitoring. ET calculations and soil moisture can be used to manage tree water stress; however, they do not directly measure the water stress of the tree. Pressure chamber stem water potential (SWP) readings do directly measure tree water stress and can be used to help deliver these beneficial stress timings while avoiding the unwanted consequences of severe stress. Mild to moderate stress (SWP readings of -12 to -16 bars) from late June up to the preharvest irrigation cut-off and again after harvest, achieve the desired mild to moderate stress level without harm to the orchard (Table 1). Cutting off irrigation in the week or two before harvest to achieve -16 to -20 bars SWP delivers the desired moderate to high stress that helps reduce dry away and trunk damage (“barking”) at harvest.
Growers with orchards (or replants) on the new Krymsk 86 (K86) rootstock should take special care to make sure trees are sufficiently dried down before shaking to avoid bark damage. Don’t expect K86 rooted trees to dry down as quickly as those on Myrobalan or Marianna-type rootstocks (M29C, M40, and M2624). Regular SWP monitoring between your irrigation sets can help you get a sense of how long it will take to dry down your trees on K86 to the -16 to -20 range before harvest.
Post-Harvest Irrigation – The “Why” and the “How”:
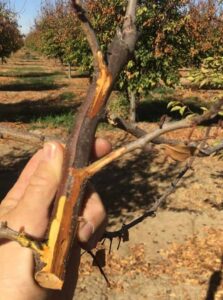 Once the crop is out of the field, follow through with careful irrigation management until either the trees have lost their leaves or there is regular autumn rain. Post-harvest irrigation should recover the trees to mild- to moderate-stress (-12 to -16 bars SWP) in order to not reduce photosynthesis and disrupt carbohydrate allocation to storage leading into overwintering. Care must be taken with any irrigation reductions – severe water stress can potentially damage the orchard for years to come. Sustained high to severe water stress during the pre-and post-harvest period can reduce potassium uptake, encourage sunburn and growth of Cytospora cankers (Figure 1) and result in smaller fruit buds the following year. Don’t walk away from your prune irrigation after harvest. You might not like what your orchard looks like at bloom.
Figure 1. Cytospora canker infections spread most rapidly in severely water-stressed (lower than -30 bars SWP) orchards. High to severe water stress is more likely to occur in late August and early September during and after harvest. Photo by Franz Niederholzer.
More information:
- Prune orchard drought considerations
- Information on using and interpreting pressure chamber SWP readings
- Management considerations for Cytospora canker
Table 1. SWP levels in prune, consideration of how SWP might compare to baseline values under various weather conditions, and the corresponding water stress symptoms to expect.
| SWP range (bars) | General Stress Level | Water stress symptoms in prune | |
| -8 to -12 | Low to mild | Favors rapid shoot growth and fruit sizing in orchards when minimal crop stress is sustained from April through mid-June. Continuing to maintain low-mild stress into the summer may not be cost-effective. | |
| -12 to -16 | Mild to Moderate | Suggested mild levels of stress during late June, July, and early August. Shoot growth slowed but fruit sizing (fresh and dry weights) is unaffected. May help manage energy and irrigation costs. | |
| -16 to -20 | Moderate to High | Should be avoided until fruit sizing is completed. Appropriate for late August (pre-harvest shut down). Imposing moderate to high levels of crop stress by reducing irrigation about two weeks before harvest may increase sugar content in fruit and reduce moisture content or “dry-away” (fruit drying costs). | |
| -20 to -30 | High to Severe | More likely to occur in late August and early September during and after harvest. Extended periods of high crop stress before harvest will result in defoliation and exposure of limbs and fruit to sunburn. Extended periods of high stress after harvest may also negatively affect the condition of trees going into dormancy. |
